Warning: Undefined variable $tt_id in /home/morestina/morestina.net/wp-content/plugins/wp-display-header/class-obenland-wp-display-header.php on line 505
Warning: Undefined variable $tt_id in /home/morestina/morestina.net/wp-content/plugins/wp-display-header/class-obenland-wp-display-header.php on line 505
class="archive category category-linux-2 category-31 custom-background wp-theme-twentyfourteen group-blog header-image list-view full-width">
Warning: Undefined variable $tt_id in /home/morestina/morestina.net/wp-content/plugins/wp-display-header/class-obenland-wp-display-header.php on line 505
Warning: Undefined variable $tt_id in /home/morestina/morestina.net/wp-content/plugins/wp-display-header/class-obenland-wp-display-header.php on line 505
Have a critical cron’d automated task? You’d like to be notified if something fails? With the ubiquity of smartphones, you can notice an error right away and take action. Wow, someone wrote to me! It’s from someone named “mdadm”. Must be spam again!
Computers sending emails for various purposes is nothing new. I have a couple of critical cron jobs on my home computer; syncing the family photos to my remote server, backing up the said remote server to my local computer, etc. These are all tasks that are defined in the daily crontab, and without a proper or any alerting system, something can go wrong and you can really find yourself in a bind if it turns out the backup procedure died months ago because the ssh key changed or something. You can either check the backup or automated task every single day to make sure nothing went wrong, or you can setup a robust alerting system that will send you an email if something goes wrong. This is not the only use case, Mdadm can also send you an email if a disk drops from a RAID array etc.
Setting up a Gmail relay system with Postfix
Installing and managing an email service is difficult, and you have to contend with all sorts of issues, is your server blacklisted, do you have the appropriate SPF records, is your IP reverse resolvable to the domain name etc, etc. Most of these requirements are difficult or impossible with a simple home computer behind a router without an FQDN. With the relay, you’ll be able to send an email without having to worry if it’ll end up in spam, or not delivered at all as it will be sent from a real Gmail account. Luckily, it’s extremely simple to set it up:
Allow “less secure” apps access your new gmail account. Don’t be fooled by how they’re calling it, we’ll be having full encryption for email transfer.
Setup Postfix.
I’ll keep the Postfix related setup high level only:
Install Postfix with your package manager and select “Internet site”
Edit /etc/postfix/sasl_passwd and add:
[smtp.gmail.com]:587 username@gmail.com:PASSWORD
Chmod /etc/postfix/sasl_passwd to 600
At the end of /etc/postfix/main.cf add:
relayhost = [smtp.gmail.com]:587 # the relayhost variable is empty by default, just fill in the rest
smtp_use_tls = yes
smtp_sasl_auth_enable = yes
smtp_sasl_security_options =
smtp_sasl_password_maps = hash:/etc/postfix/sasl_passwd
smtp_tls_CAfile = /etc/ssl/certs/ca-certificates.crt
Use postmap to hash and compile the contents of the sasl_password file:
# postmap /etc/postfix/sasl_passwd
Restart the postfix service
Your computer should now be able to send emails. Test with a little bit of here document magic:
If everything went fine, you should be getting the email promptly from your new gmail account. I haven’t tried with other email providers, but it should all be pretty much the same.
Usage example
Now that you have a working relay, it’s time to put it to good use. Here is a simple template script with two key functions that can be sourced through Bash so you can use it within other scripts without having to copy & paste it around.
#!/bin/bash

# Global variables
NAME=$(basename "$0")
LOG=/var/log/"$NAME".log
EMAIL=youremail@whatever.com
LOCKFILE=/tmp/"$NAME".lock
HOST=$(hostname -s)

# All STDERR is appended to $LOG
exec 2>>$LOG

# An alert function if the locking fails
function lock_failure {
  mail -s "Instance of "$0" is already running on $HOST" $EMAIL << EOF
Instance of "$0" already running on $HOST. Locking failed.
EOF
  exit 1
}

# An alert function if something goes wrong in the main procedure
function failure_alert {
  mail -s "An error has occured with "$0" on $HOST" $EMAIL << EOF
An error has occured with "$0" on $HOST. Procedure failed. Please check "$LOG"
EOF
  exit 1
}


function procedure {
  # If file locking with FD 9 fails, lock_failure is invoked
  (
    flock -n 9 || lock_failure
    (
      # The entire procedure is started in a subshell with set -e. If a command fails
      # the subshell will return a non-zero exit status and will trigger failure_alert
      set -e
      date >> $LOG
      command 1
      command 2
      [...]
    )

    if [ $? != 0 ]; then
      failure_alert
    fi

  ) 9>$LOCKFILE
}

function main {
  procedure
}

main
flock(1) is used to make sure there is only one instance of the script running, and we’re checking the exit status of the commands. If you don’t need instance locking, you can simply forego the lock_failure function. The actual work is contained in another subshell which is terminated if any of the commands in the chain fail and sends an email advising you to check $LOG.
Conclusion
A lot of Linux services like Mdadm or S.M.A.R.T. have a feature to send emails if something goes wrong. For example, I set it up to send me an email if a drive fails inside my RAID 1 array, I just had to enter my email address in a variable called MAILADDR in the mdadm.conf file. A couple of days later, I received an email at 7 AM; ooooh someone emailed me. I had a rude awakening, it was Mr. Mdadm saying that I have a degraded array. It turned out to be the SATA cabling that was at fault, but still. This could have gone unnoticed for who knows how long and if the other disk from the RAID 1 failed later on, I could have had serious data loss. If you want to keep your data long term you can’t take any chances, you need to know if your RAID has blown up and not rely on yourself to check it out periodically, you won’t, you can’t, that’s why we automate.
Be careful when you write these programs. If your script is buggy and starts sending a lot of emails at once for no good reason, Gmail will block your ass faster than you can say “Linux rules!” If you’re blocked by Gmail, you might miss an important email from your computer.
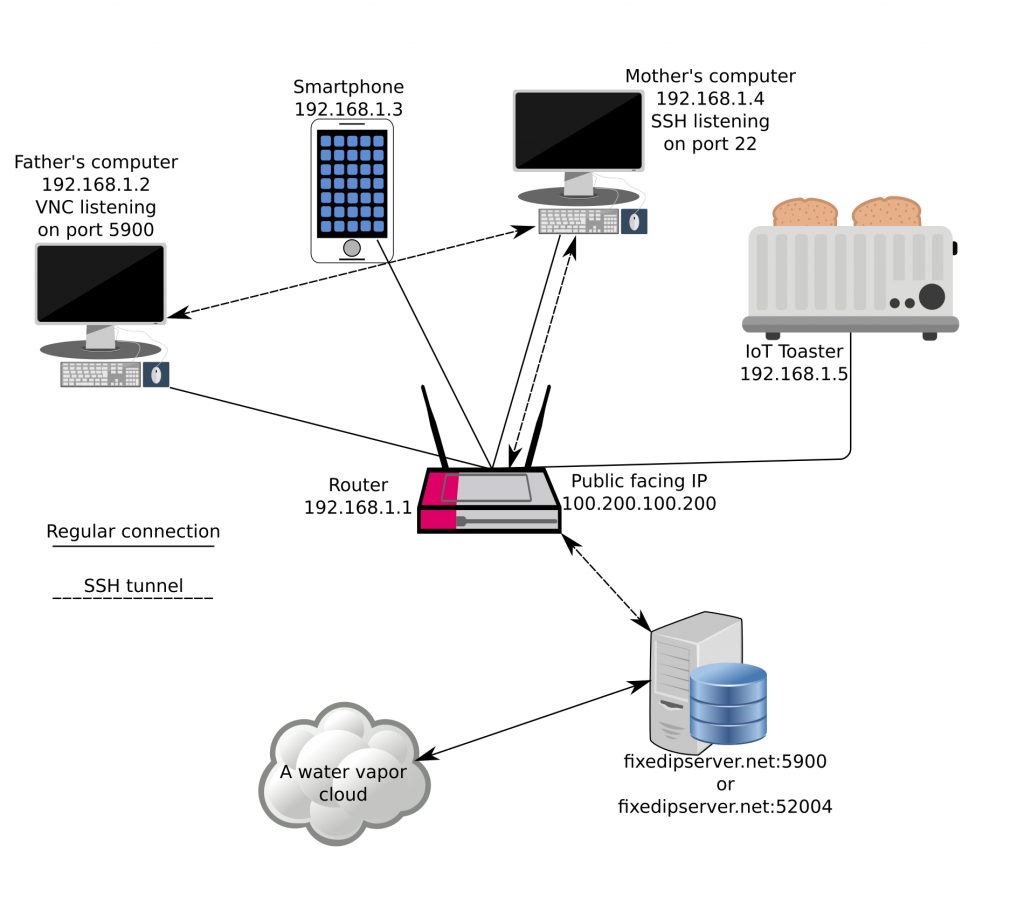
SSH can be more than a secure shell. It has a cornucopia of features and use cases, it’s mature, and extremely widely used. I’ll cover NAT busting today with SSH. Say your parents are behind a shitty ISP and an unstable connection, and your mother has Linux installed, while your father has Windows installed. His computer sometimes misbehaves, and you want to connect via VNC, but the shitty router of the shitty ISP has managed to mangle all the port forward configs and the dyndns script failed to update the IP because $REASONS. As with all NAT busting schemes, you’ll need a third computer somewhere connected to the internet with a fixed IP address.
What’s the problem?
Simply put, NAT (Network address translation) is a popular way to group many IP addresses (computers and various devices, phones on a local area network) into a public facing one. When you connect to a remote host, the router keeps track of individual requests. If your computer’s address is 192.168.1.4, the remote host can’t send data back to a private network across the internet. The response is sent back to the public IP address and a random port chosen by your home router, which is then forwarded to 192.168.1.4 from the router. This all works great for connecting to websites, game servers, and whatnot, but what if you want to connect from the outside to a specific computer inside a NAT-ed environment in a way that is robust and secure?
SSH to the rescue
I’ll first cover the steps how to perform NAT busting to get access to the hypothetical mother computer:
Create a user for that purpose on the server with the fixed IP. Use /bin/false as the user shell as an extra security measure.
Place the mother’s public SSH key in the user’s authorized_keys file for passwordless login.
You’ll need to put GatewayPorts yes and ClientAliveInterval 10 in the sshd config on the server and restart the SSH daemon. The ClientAliveInterval setting is very important, I’ll come back to it.
After this is done, we can proceed with setting up the actual tunnel:
$ ssh -fNg -R 52004:localhost:22 user@fixedipserver.net # On the mother's computer
$ ssh -p 52004 mother@fixedipserver.net # Connect to the mother's computer
"-f" switches ssh right to the background, "-N" is a switch to not execute any remote command, "-g" allows remote hosts to connect to local forwarded ports, and "-R" is here to specify the remote port, the IP on the local server, in our case localhost and local port, port:host:hostport. The "GatewayPorts yes" option is needed because SSH by default won’t allow to bind on anything other than 127.0.0.1, I guess this is a security feature. Basically, we have now exposed the port 22 of my mother’s computer and bound it to the 52004 port on fixedipserver.net so make sure that your dear mother’s SSH is properly secure, it would be best to disable password logins altogether if possible. The fixed IP server now acts as a bridge between you and the computer behind the NAT, and when you ssh to the port 52004 you’ll be expected to present the credentials of the mother’s computer, and not the fixed IP server. Nice, huh?
Wait a second Mr. Kitty, how exactly is this persistent?
It’s not. Two problems come to mind; the mother reboots the computer and poof, the tunnel is gone, or the shitty ISP router reconnects. Enter Autossh, it comes packaged with most newer distros. The author says: “autossh is a program to start a copy of ssh and monitor it, restarting it as necessary should it die or stop passing traffic.”
Wow, just what we need! We’ll just fire it up like so:
Please note that you need to enable GatewayPorts yes on the mother’s computer as well if you want to route traffic like this. No need for autossh for these temporary interventions, and it’s probably a bad idea to have port 5900 open to the public all the time.
Autossh tuning for an even more robust tunnel
Autossh with its default settings is probably good enough for most cases. Certain ISP routers have a very nasty habit of killing idle connections. No communications on an open TCP connection for 2 minutes? Drop it like a hot potato without letting anyone know. The computer behind the router is convinced the connection is still alive, but if it tries to communicate via that open connection all the packets seemingly go into a black hole and the network stack takes a while to realize what’s going on. Now, let’s get back to ClientAliveInterval 10 and why it’s so important:
This is all fine and dandy, but a true sysadmin will always test his assumptions and procedures. I setup a simple autossh tunnel, browsed to my DD-WRT web GUI and reset the modem to simulate an internet crash. The modem quickly recovered, the internet connection was restored and after a few minutes, whoops:
$ telnet fixedipserver.net 52004
Trying 100.100.100.100...
Connected to fixedipserver.net.
Escape character is '^]'.
Not good, where the hell is “SSH-2.0-OpenSSH_7.2p2 Ubuntu-4ubuntu2.1” that I usually get? I only managed to connect to the dangling port on the server that leads nowhere. The connection server-side is disconnected after 30 seconds at these settings, however under slightly different conditions while I was testing the port 52004 is still bound by the old connection the ssh daemon hasn’t cleaned up yet causing ssh to fail to create a tunnel because the server says that port 52004 is busy. Fine, fair enough, however the big problem is that ssh will not exit because of this when trying to establish a tunnel. It’s a warning only and the process is still up & running. As far as autossh is concerned all is dandy. Well, it’s not! With the -o "ExitOnForwardFailure yes" we force that this kind of error makes ssh exit with a non-zero exit status and makes autossh do its intended purpose; try to reconnect again and again. The environment variable AUTOSSH_POLL makes it do internal checks of the ssh process a little bit more frequently.
The -M 0 disables autossh’s builtin monitoring using echo and relying on SSH’s very own ServerAliveInterval 15 which probes the connection every 15 seconds, and ServerAliveCountMax 2 is the number of tries until SSH will kill off the connection if the connection is down. In conjunction with ServerAliveInterval 15 assuming the connection was reset, ssh will again exit with a nasty non-zero exit status which will force autossh to react. It is an absolutely crucial setting to achieve true high availability with a disconnecty modem. The idea is to get an up & running tunnel as soon as it’s theoretically possible, IE, the end client has a fully working internet connection once again. Without the echo method we achieve a pretty simple and robust setup in the end. If you connect to fixedipserver.net port 5900 it will route you to the father’s computer over the mother’s computer. If you connect to port 52004 you will get the mother’s ssh service, port 22.
Set the two following options in the sshd config and reload the daemon:
GatewayPorts yes
ClientAliveInterval 10
We’ll need to set an environment variable before starting Autossh. You can use this as a reference for a simple script:
#!/bin/bash

REMOTE_PORT=40000 # The exposed port on the fixed IP server that you'll be connecting to
DESTINATION_HOST=localhost # Any host that is connectable from the computer initiating ssh/autossh can be set, be it a server inside the LAN, or a server on the internet, or localhost, it doesn't matter to SSH
LOCAL_PORT=22 # The destination port we want to have access to (port 22 - SSH in our example, can be anything, doesn't even need to be open)

export AUTOSSH_POLL=45
autossh -M 0 -o "ExitOnForwardFailure yes" -o "ServerAliveInterval 15" -o "ServerAliveCountMax 2" -fNg -R $REMOTE_PORT:$DESTINATION_HOST:$LOCAL_PORT user@fixedipserver.net
And finally, you can set a cronjob:
@reboot connect_script
Final thoughts
The robust tunnel part is really necessary if you have a mission critical server or client somewhere behind a flaky connection, whether you need it for pure ssh access or you need it for something like VNC or another service somewhere on the remote private network. Please keep in mind that any forwards you setup like this will be available from anywhere on our hypothetical fixedipserver.net server. Who knows what kind of vulnerabilities a service has, so firewall everything off on the server with the fixed IP. There is some good news though, if someone does hack into the remote machine via your open VNC port or whatever, you can rest assured in the knowledge that their traffic between the fixed IP server and your pwned service are safe with a state of the art encryption protocol provided by the wonderful Secure Shell.
The wonders of the smartphone. For us tech savvy people the current modern variant of the smartphone is pretty neat. You can navigate across the globe with the maps, you can of course listen to music or watch films, take photos, view photos, surf the net, etc. As most parents, I too love to talk about my kid, and I like showing a couple of pics to friends.
In earlier posts I was talking about managing, keeping your collection safe, organized. What if you find yourself in the situation that you want to show a specific picture to someone? You can’t expect to have all the photos you’ve taken over various devices to be present on your smartphone. This seemed like a good idea actually, to have access to all of your pictures on the phone.
My wishlist:
The pics themselves be somewhere on the internet, or my home computer so I can connect via a dynamic DNS service.
The pictures are scaled and quality lowered, so I don’t spend a lot of mobile data viewing unnecessarily large photographs, ~100 KiB per picture or even less. It should be fine for a smartphone display.
It would be extremely nice if the whole thing is encrypted end to end.
Turns out there are a couple of solutions already present on the market. One of them is Plex. A cursory glance at the website seems to indicate that it has what I want. There were some issues, however. First off, it’s a totally closed, proprietary bullshit service. How does it work? Supposedly you install the Plex media server on your computer, and with a client on your smartphone you connect directly to your library of photos, videos and music on your PC. Someone even packaged it for Arch Linux. The entire package is over 130 MiB in size. Unfortunately, this service is a bit of an overkill for my requirements. It’s an entire platform for you to play your mostly pirated stuff from a remote location. Sure, that makes sense for some people, but all I need is a gallery viewer and to somehow fetch the photos over the internet.
My first thought was, do they even encrypt this traffic between the phone and your home computer? Of course they didn’t. They do now, but the encryption was implemented a couple of months ago. Seems they even pitched in for a wildcard SSL certificate of some sort. If it’s a wildcard certificate for their domains, that means they proxy the traffic somehow. But considering their track record with basic security, ie, having no encryption of any kind, I’m not so convinced they actually encrypt the entire stream from end to end. To be fair, they have to support a lot of shady devices, like TVs and such, and there’s no telling what kind of CAs do these devices have and what kind of limitations are imposed.
OK, so I gave up on Plex, there has to be some kind of simpler solution. I noticed that an app I was already using, QuickPic, has native support for Flickr, Picasa, some others, and Owncloud. I really don’t want to give all my photos to a nameless cloud provider, but Owncloud, now that’s something. I have a budget dedicated server in Paris, and I decided to give it a try. I won’t go into details on how to install Owncloud. I’m using the Nginx webserver with PHP-FPM. Since the server isn’t exactly mine, and I have issues with trusting private data to anyone, I decided to use a loopback device on the server with a bigass file, and encrypted it with cryptsetup and is mounted to serve as the data directory of Owncloud. This way, once the server is decommissioned or a disk fails, no one will be able to see the content from the Owncloud data directory.
I don’t really want to go into the Owncloud installation. It’s relatively simple, it supports MySQL, Postgresql, sqlite, needs a reasonably recent PHP version and a webserver like Apache, or Nginx. So all I had to do now is prepare the photos, so I can upload them. And once again, Linux comes to the rescue. First, I copied the entire library to somewhere so I can test out the recoding mechanism. All my photos are in an extremely simple hierarchy. YYYY-MM, so that’s 12 directories per year. So:
for i in * ; do (cd $i; mogrify -auto-orient -quality 55 *); done
After that it’s pretty much as you’d expect. Upload the photos via the Owncloud client for Linux which works pretty much Dropbox. Once it’s uploaded you can setup QuickPic on your android phone to connect to the Owncloud instance. And that’s it, you can now access your full photo collection, you’ll just have to periodically add new pictures into the mix. Keep in mind that Owncloud generates the thumbnails on the fly when QuickPic requests photos, which is pretty cool. It’s not blazing fast, but it’s acceptable. The thumbnails are then cached in the Owncloud’s data directory, meaning that it will be a lot faster the second time you view the same directory.
I’ve also setup a script that automatically recodes all the images I take from my digital camera and uploads it to the server. That way I can have access to all the latest photos, I can view them from anywhere. Everything is reasonably secure, under your control.
QuickPic is a great photo app for smartphones in general, not just for Owncloud used in this way.
In 2003 my father bought a digital camera for the family. It was an Olympus C-350 Zoom, 3.2 mpix, 3x optical zoom, a 1.8″ LCD display. At that time, at least here in Croatia, having a digital camera was fairly rare. I’m not saying I had it first in my city, but it wasn’t as commonplace as today. This was such a leap from anything that you owned. You could actually take a picture and upload it to the computer. And the image was usually great if the light conditions were optimal, of course. Indoors, and with low lighting the images were terrible.
Šibenik circa 2003/07 on a good day
Sorry dude, it’s 7:59:34 PM on an August the 18th. There’s less sunlight than you think at this time of the year, so better keep the camera perfectly steady for one fifths a second.
This camera wasn’t cheap. It cost a little less than $500. For Croatian standards of the time it was a fair amount of money. Still is actually, but that is the minimum you have to spend to have a decent camera, it was like that then, it’s still like that now.
I was making pictures of the town, taking it on trips, documenting everything. Since I was always a computer enthusiast I was beginning to worry, what if the hard disk failed? I’d lose all of the photographs I had acquired. There are people that seem to underestimate the importance of photos. You take the photos, they’re nice, but they’re not that valuable right at that moment. Looking back 10 years or more, suddenly the pictures become somehow irreplaceable. They’re a direct window into your past, not the blurry vision of the past that most of us have, but something concrete and immutable. I think this especially applies when you have kids, you’ll want the pictures safe and sound, at least for a little while. Everything gets lost in the end, but why be the guy that loses something that could be classified as a family heirloom?
How not to lose the pictures and how to organize them
Here’s a high-level list of what I’ve found to be good practices, to keep it organized and safe:
A clear structure of stored photographs/videos. I’ve found that a single root directory with a simple YYYY-MM does the trick. I dislike categorizing pictures with directory names like summer-vacation-2003, party-at-friends-house-whose-name-I-cant-remember or something to that effect. I think that over time, the good times you had get muddled along the way, and you’ll appreciate a simple year-month format to find something or to remember an occasion. It’s like a time machine, let’s see what I was doing in the spring of 2004, and you can find fun pictures along the way.
This goes without saying, backups. Buy an external disk, they go cheap, and you can store a lot of photos there. Your disk can die suddenly and without notice, and all your pictures can simply vanish, never to be seen again. Sure, son, I’d love to show you pictures when I was young, but unfortunately, I couldn’t be bothered to have a backup ready and all the pictures are gone.
Disaster recovery – imagine your whole building/house burns to the ground. You get nothing but rubble, and although you were meticulously syncrhonizing to your backup every night to an external HDD, everything is gone. Or more realistically, your house gets broken into and they steal your electronics which contain data that is basically irreplaceable. Create a tarball of all your photographs/videos, encrypt it with a GPG key or passphrase, or with a simple SSL encryption and upload it into the cloud of your choice. Even in the event of a burglary/arson with a regular snapshot of about once per two months, you’ll still be able to recover most of the data when you rebuild your house or buy a new computer in the event of a burglary.
Print out a yearly compilation of pictures that you like at your local photo lab. Just pick like 40 of the best, with whatever criteria you deem fit. Who knows if the JPEG standard will be readable in 30 years time, but you can always look at a physical picture you can take with you.
I just called in a burglary at my house. Now it burned down while getting beers from the store? If only I had a disaster recovery plan for my valuable photos on both desktop computer and portable HDD.
Photos
Most digital cameras, be it video or still frames, have pretty lavish defaults with the image quality. This is a very good thing. I like to get a source file that is close as possible as the device has serialized it to a file. Still, if you take a lot of pictures, you’ll quickly notice that it’s piling up. The first thing to do is delete the technically failed ones. Do not delete the pictures where you think that someone is ugly on it, it may end up great in a certain set of circumstances. You never know.
These days even the shittiest cameras boast with huge pixel numbers, like 10, 15 mega pixels or more with a tiny crappy lens and who knows what kind of sensor. Feel free to downsize it to 5-8 mega pixels, with a JPEG quality of 75-80. Quickly you’ll see that now your images consume a lot less space on the HDD, I’m talking about 30% of the original photo, sometimes even less. I spent a lot of time trying to find exactly how the image is degraded. Some slight aberrations can be seen if you go pixel peeping, but screw that, the photos might have sentimental value on the whole, and you’ve saved a lot of hard drive space that you realistically have available. I recommend using the Imagemagick suite for all your resizing needs. Create a directory where you want the recoded images, like lowres:
You can set the number of pixels, in this example it’s 8.64Mpix. Choose a resolution and go with it. I generally use 3600×2400 which is 8640000 in pixels. Mogrify is great for this task, it can encode the images in parallel, so if you have a multi-core computer it really shines since the operations involved are very CPU expensive. You can omit the -path switch, and the files will be processed and placed instead of the file, but be careful as this WILL overwrite the original file(s). Don’t test around on your only copy of the file. You can use the generally more safe convert which takes the same argument with a slight difference, it needs the INFILE and OUTFILE argument:
$ for JPEGS in *.jpg ; do convert -auto-orient -quality 80 -resize 8640000@ $JPEGS $JPEGS-out; done
The problem with this is that you’ll then have a bunch of IMG_xxxx.jpg-out files. This is the longer way around, but once you’re satisfied with the result, delete the original jpeg files and rename it with a program that mass renames or you can use a perl script called ren, my brother and a buddy of his wrote a long time ago and it still works great for a number of circumstances:
$ ren -c -e 's/\-out//'
This will rename all the files that have the -out to empty string, deleting it from the filename essentially. But this is the long way around, I suggest using mogrify. Mogrify had a very very nasty bug. At one point they decided that it would be cool if you have an Nvidia card and the proprietary drivers installed it would use the GPU for all your encoding needs. That sounds great in theory, but I actually had an Nvidia graphics card with the drivers properly installed. How do I know that? Complex 3D video games worked without issues. And guess what else? It didn’t fucking work. It simply hang there, and didn’t do anything, it would never finish a single image. Did I mention that you can’t fallback on the CPU so easily, I mean at all? I googled around, and multiple bugs were filed. I just tried mogrify now when writing this post, seems they have finally fixed it, and I may go back to using it again, instead of unnecessarily complex python scripts that called concurrent converts which number was based on the number of your physical cores.
Video
A nice feature of modern cameras is its ability to record decent video and audio. The cameras mostly use a very good quality preset for the recordings. On my current SLR camera I get 5-6 megabytes per second for a video. Not only that the files are monstrously huge, they also are sometimes in non-standard containers, have weird video and/or audio encodings. You should really convert it to something decent:
This produces a pretty good quality video. I am strongly against rescaleing the video in any way. Use the original resolution, the displays are advancing at a stable pace, you don’t want to unnecessarily scale down the resolution. You can change the quality with -crf from 18-29 are reasonable options, I discussed it in another post in more detail. Also, it decreases the file size by a factor of 15 or more, virtually without perceptible visual loss. As an added bonus you mux it into an open source container with the h264 family of encoders and the venerable mp3 format for audio. That should work on most computer players by default as well as standalone players hooked up to a TV.
I started this post as more of an in-depth technical overview how to store and encode your multimedia and backing it up. But instead I chose to give a high-level overview of what worked for me over the years. Make backups regularly, have a disaster recovery option present if at all possible, and print out some yearly photos. It’s fun to look over the physical pictures, and can be good fun showing it to visiting friends and family. When deciding how much to shrink the files, always keep in mind that you should compress them as much as possible while keeping the subjective perception of the quality as close as possible to the original. What I mean to say, don’t overdo with the quality settings. What matters is how much space is your archive consuming right now, and how are you able to cope with that amount of data.
Data loss is commonplace. Hard drives fail, do not lose 10+ years of photographs because you didn’t have a decent backup. It’s not so hard. Do it now. Don’t lose a part of your personal history, it’s priceless, and cannot be downloaded from the internet again. Always encrypt your stuff before uploading to the ethereal cloud. Maybe you have sensitive pictures that you wouldn’t want anyone else casually looking over just because they happen to be the sysadmin. You wouldn’t make the same kind of privacy breach in other parts of your life, would you?
Over the years I’ve collected a lot of pictures, coming close to 20000. Most of these pictures have the exif metadata embedded in the JPEG files. Alas, I was careless with some of the photographs, and when copying over from filesystem to filesystem, creating backups etc., the timestamps got overwritten. So now I had loads of files that had a timestamp of 22nd January 2010 for example. They were most definitely not taken at that date, but rather they were copied then and no preserve timestamp flag was enabled at the time of the cp issued. I googled for a quick solution to my problems, but I could not find anything that would be simple to use, and not clogged up with bullshit. So, I cracked my knuckles and delved into the world of Python:
#!/usr/bin/python2

# You need the exifread module installed
import exifread, time, datetime, os, sys

def collect_data(file):
    tags = exifread.process_file(open(file), 'rb')
    for tag in tags.keys():
        if tag in ('EXIF DateTimeOriginal'):
            return "%s" % (tags[tag])

for file in sys.argv[1:]:
    try:
        phototaken = int(datetime.datetime.strptime(collect_data(file), '%Y:%m:%d %H:%M:%S').strftime("%s"))
        os.utime(file,(phototaken,phototaken))
    except Exception, e:
        sys.stderr.write(str(e))
        sys.stderr.write('Failed on ' + str(file) + '\n')
Basically it takes each file, reads the exif metadata for photo taken and invokes the os.utime() function to set the timestamp to that date. You’ll need the exifread module for Python, this is the simplest one I could find that can do what I needed it to do. I hope someone will find this script useful. You can start it simply with $ exify *.JPG. You can download it here.
I’m sure a lot of people have always thought, wow, I’d like to record a video of this to have it around! On Linux! Well, with it’s incredibly easy! OK, not really so easy, you’ll have to handle a few hurdles along the way, but it’s nothing terrible. As an example I’ll be using prboom which is an engine to run Doom 1/2 with the original WADs you have obtained legally, paid for fair and square etc. It uses 3D hardware acceleration, no jumping, crouching and shit like that. It’s great to see Doom 1/2 in in high resolution, it looks pretty good, and very true to the original, and makes the game more than playable.
There is a beautiful program called glc. Basically it hooks to the video & audio of the system and dumps a shitload of fastest compressing png files, that is one per frame. Depending on the resolution you use for capturing and the framerate, expect very hardcore output per second to your HDD, somewhere around 50 megabytes per second for a full hd experience, and that’s with the quicklz compression method for glc-capture.
I won’t go into too much detail how to install glc, or prboom. I’m sure it’s simple for your favorite Linux distribution. It was a simple aurget -S on Arch. Now,let’s head on to actually capturing some gameplay. The syntax is very simple glc-capture [options] [program] [programs' arguments]:
This was the tricky part, I had to play around with the options to get it glitch free inside the game. I’ve recorded a video three years ago with glc, can’t remember using some of these options. -j – force-sdl-alsa-drv, got better performance, but maybe unneeded, play around with it -s – so recording starts right away -f – sets the framerate -n – locks FPS, didn’t need this before, but you get a glitch-free recording -z none – no PNG compression, I’ve had better performances without compression The prboom-plus options should be self-explanatory, I’ve used the 1920×1080 resolution so it’s youtube friendly. The -warp is to warp to level 13, and -skill 5 is for nightmare. The file output is named $PROGRAM-$PID-0.glc by default.
OK, the easy part is done, apart from the tricky part. Now you have a huge-ass .glc file on your hard drive that is completely unplayable by any video player known to man. And when I say huge-ass, I mean huge-ass. A 54 second video comes out to 1.79GB, which is 34MB per second in 720p, and for 1080p I had up to 42MB per second! The default png compression used by glc-capture is quicklz. For 1080p I had some better experiences using -z none so it simply dumps the PNGs into the file and that’s it. As you might figure, this will also increase the resulting file size, but it could be well worth the disk space if you don’t have a fast CPU. You’ll get close to a 100 MB/s for a 1080p stream. Use the default compression if in doubt. Experiment.
What do we do with an unplayable, unusable, unuploadable gigantic glc dump on our hard drive? I strongly suggest you encode it somehow. I used to use mencoder for all my encoding needs. Due to the way it’s maintained, or a lack thereof, I switched to ffmpeg which has an active development and used a lot in the backends of various video tube sites around the internet. OK, let’s go, step by step:
Extract the audio track
$ glc-play prboom-plus-12745-0.glc -a 1 -o 1080p.wav
This line dumps the audio track from the glc file, of course it’s a completely uncompressed wave file. -a 1 is for track #1, and -o is for output, naturally.
Pipe the uncompressed video to ffmpeg and encode to a reasonable file format
-o - dumps it to STDOUT, -y 1 is for video track 1. Now we have used the all might unix PIPE. I love pipes. In this case ffmpeg uses two files as input, one is STDIN, that is the hardcore raw video file, no pngs, just raw video. The other input is the audio track we dumped earlier. This could be streamlined with a FIFO, but that’s overcomplicating things. The rest of the ffmpeg options are beyond the scope of this article, but they’re a reasonable default. The final argument of ffmpeg is the output file. The container type is determined by the file extension, so you can use mp4, mkv, or whatever you want. After this, the video is finally playable, uploadable, usable. Congrats, you have just recorded your video the Linux way!
If you do want to customize the final video quality, take a look at the the ffmpeg documentation at what these mean. The only thing of interest is the -preset and the -crf. The crf is the “quality” of the video. I was astounded that 2-pass encoding is a thing of the past, and it’s all about the crf now. It goes from 0 to 51. And only a small part of that integer range is actually usable. I simply cannot relay the beautiful wording from the docs, so I’ll just paste it here:
The range of the quantizer scale is 0-51: where 0 is lossless, 23 is default, and 51 is worst possible. A lower value is a higher quality and a subjectively sane range is 18-28. Consider 18 to be visually lossless or nearly so: it should look the same or nearly the same as the input but it isn’t technically lossless.
Details like these can really brighten a person’s day. 18 is visually lossless (and no doubt uses a billion bits per second), but technically only 0 is lossless. So you have a full range from 0 to 18 that is basically useless. Of course, it goes the other way around. After -crf 29 the quality really goes downhill.
The resulting video can be found here or you can see it on YouTube. Excuse my cheating and my dying so fast, this is for demonstration purposes.
Conclusion
I realize there are probably better ways of accomplishing this, you can google around for better solutions. Glc-capture supposedly works with wine too, with some tweaks. I haven’t really tried it, but feel free to leave a comment if someone had any experience with it. This is a simple way to make a recording, you can edit it later once you encode the file to something normal. Glc also supports recording multiple audio tracks so you could also record your voice with a microphone and mash it all together. Good luck with that. :)